**Disable Chrome Hardware Acceleration: Simple Steps to Boost Performance and Fix Glitches
**Disable Chrome Hardware Acceleration: Simple Steps to Boost Performance and Fix Glitches
Disabling Chrome hardware acceleration can be an easy solution to resolve computer crashes, slow performance, and bugs caused by the browser's reliance on graphics processing units (GPUs) and central processing units (CPUs). For many users, this feature can be a hidden culprit behind system instability and decreased productivity. By disabling Chrome's hardware acceleration, users can prevent software and hardware issues, making their browsing experience smoother and faster.
Chrome's hardware acceleration feature is enabled by default, allowing the browser to offload tasks from the CPU to the GPU, which can provide a boost in performance, especially in graphics-intensive tasks. However, this feature can be a double-edged sword, as it can sometimes lead to system crashes, slowness, and screen glitches, especially when the system's hardware is not compatible with the feature. To avoid these issues, users can easily disable Chrome's hardware acceleration with a few simple steps.
The Mechanics of Hardware Acceleration in Chrome
Hardware acceleration in Chrome works by taking advantage of the powerful processing capabilities of GPUs to execute tasks such as rendering web page graphics, playing videos, and performing other computationally intensive tasks. By utilizing the GPU instead of the CPU, Chrome can improve performance, but this feature requires compatible hardware and adequate drivers. Unfortunately, not all systems have compatible hardware or up-to-date drivers, which can lead to issues when running Chrome hardware acceleration.
"When Chrome engineers improve hardware acceleration, it means they're making better use of the graphics processor," says Darren Neimann, Chrome engineer at Google. "By freeing up the CPU to focus on other tasks, Chrome can browse the web faster and smoothly."
Why Disable Chrome Hardware Acceleration?
There are several reasons why users may need to disable Chrome's hardware acceleration. Some possible reasons include the following:
* Browser crashes and freezes: Hardware acceleration can cause the browser to become unresponsive, leading to crashes and freezes.
* Screen glitches and artifacts: Graphics corruption and display issues may appear when the browser is unable to properly utilize the GPU.
* Incompatible hardware: Some systems may not support the necessary graphics drivers or have outdated hardware, leading to inconsistencies and decreased performance.
* Software conflicts: Incompatibilities between new software and existing hardware or driver updates can cause Chrome's hardware acceleration to malfunction.
Disable Chrome Hardware Acceleration: Simple Steps
Disabling hardware acceleration is a straightforward process that can be completed in just a few steps.
### Step 1: Access Chrome Settings
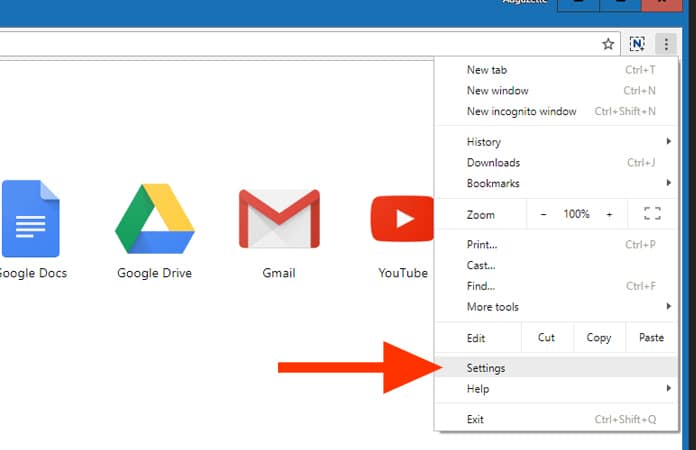
1. Open Chrome and click on the three vertical dots in the upper right-hand corner of the browser window.
2. Click on **Settings** from the dropdown menu.
3. Scroll down to the **Advanced** section.
### Step 2: Navigate to System Settings
1. Click on **System** from the **Advanced** section.
2. Scroll down to the **Hardware Acceleration** section.
### Step 3: Disable Hardware Acceleration
1. Assuming you're on Windows, toggle the switch next to **Use hardware acceleration when available** to the **off** position. For macOS users, you can find the same option in the **System preferences** menu.
Alternative Settings to Disable Hardware Acceleration
For those who prefer a more detailed approach, Chrome has a flag that allows users to disable the feature. This can be done in the following way:
### Step 1: Access Chrome Flags
1. Open Chrome and type **chrome://flags** in the address bar.
2. Press **Enter** to open the Chrome flags page.
### Step 2: Search for the Flag
1. Type **hardware acceleration** in the **Search flags** box.
2. Press **Enter** to find the flag.
### Step 3: Disable Hardware Acceleration
1. Click the dropdown menu for the **Force Disable GPU rendering** or **Disable GPU acceleration** accordingly in the right-hand column.
2. Click the **Relaunch** button in the bottom of the Chrome flags page.
### Step 4: Confirm Disabling
1. Click **Relaunch** even if prompted to.
2. Chrome will restart, and the change takes effect.
Important Considerations
Disabling hardware acceleration in Chrome typically improves performance and stability but may not be necessary for all users. However, before disabling the feature, consider the following:
* GPU-dependent applications: Some applications that rely on GPU acceleration may not run as intended after hardware acceleration is disabled.
* Computer resources: Disabling hardware acceleration may result in increased CPU usage and decreased system performance.
Conclusion
Disabling Chrome hardware acceleration can be a simple solution to resolve performance issues and crashes in your browser. With just a few simple steps, users can toggle off this feature and prevent unwanted crashes and glitches.


Related Post

Criminals Behind Bars: Uncovering the Faces of Gaston County's Latest Arrests

Unveiling the Mystique of Sister Wives: A Deep Dive into Polygamy and its Cultural Significance

Kevin Gates' Jaw-Dropping Fortune: A Closer Look at His Net Worth

Uncovering the Truth Behind Arrest Log Collier County: A Deep Dive into Crime Statistics and Law Enforcement Strategies


